How to install an electric fence for animals correctly
An assessment of promising areas for improving the efficiency of pasture use for cattle has shown that it is organizationally and economically feasible to transform low-productivity agricultural lands into more productive cultivated pastures by sowing perennial and annual grasses and using small-panel and large-panel methods of grazing animals using an electric shepherd.
Electric fences provide portioned, most efficient use of grass in small paddocks. With the large-panel method, instead of an expensive capital fence, it is also advisable to use a cheap electric shepherd.
COMPONENTS OF AN ELECTRIC SHEPHERD
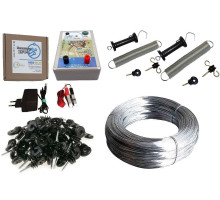
Let's consider the main elements for constructing an electric fence:
1. Electric shepherd (generator)
2. Conductors (wires, tapes, cords)
4. Posts
5. Wicket kit
6. Connectors
7. Grounding pole
9. Tester
10. Special high-voltage cable
11. Additional elements
RECOMMENDATIONS ON HEIGHT AND NUMBER OF LINES
For different animals, different heights of conductor placement and number of lines are recommended depending on physiological characteristics.

GENERAL DIAGRAM
Let's look at the general appearance of the electric fence in the diagram. The example shows a fence with three lines.

HOW THE DESIGN WORKS
How the electric fence works under normal conditions: the animal simultaneously touches the ground and the electric fence conductor and receives a slight electric shock.
The electric fence (generator) produces high-voltage pulses that pass through the conductors at a frequency of 1 time per second. When the animal comes into contact with the fence, the electric current passes through the animal's body into the ground. The animal receives a slight electric shock and moves away from the fence. The electric shock does not pose a danger to the animal's life, but it develops a stable reflex in the animal not to approach the fence.
Power options for electric fences:
powered by a 220 V network
powered by a 12 V battery
powered by a solar battery
If possible, always choose an electric fence that runs on electricity. A powerful fence is needed when:
animals with long hair are grazing
the fence tape is located low (risk: grass may touch the fence)
the fence is long
there are males in the herd
INSTALLING WICKET POSTS:
1. Decide on the layout of the territory, the location of the electric fence, the number and location of the passages.
2. Install the posts for the gate. The gate should ensure unimpeded passage of animals, people and equipment.
3. Install the posts for the electric fence along the entire perimeter.
The height of the posts should be fixed along the entire perimeter (in relation to the landscape). The distance between the posts is selected taking into account the landscape. The more differences in height, unevenness, ditches, etc., the more often the posts are installed. The maximum distance between the posts is 10 meters.
WICKET SIZE
The recommended width of the wicket, depending on the kit used, is from 2.5 m to 4.5 m. Spring kit: 4.5 m. Kit with flexible cord: 3.2 or 4.5 m.
When using only handles and insulators for the wicket separately, the distance between the posts should be from 2.5 to 3.5 m.

Installation procedure:
1. Install the gate posts
2. Screw the gate insulators into the posts
3. Connect the spring to the insulated handle
4. Install the spring kit on the gate insulators
Installing the gate kit:
1. The gate kit consists of a spring, an insulated handle and gate insulators. Insulated handles allow you to open and close the gate without turning off the electric fence.
2. Select the optimal height of the electric fence lines. The height and number of lines for each type of animal is selected according to the recommendations.
INSTALLATION OF INSULATORS
1. Install posts for the electric fence along the entire perimeter
2. Mark the height of the fence lines.
3. The height of the lines is selected taking into account the recommendations for each type of animal.
4. Screw in the posts insulators using a special device.
5. Check that all insulators are installed with the slot for the conductor facing up.

Important!When using wooden poles, installation of insulators is mandatory, since voltage losses on damp wood are significant. Conductors should not touch uninsulated elements of the fence. This can lead to breakdown of the electric fence.
CONNECTING THE LINES TOGETHER
Connect the lines to each other with jumpers. Run electricity under the gate using a high-voltage cable. This will ensure a good flow of electricity through the gate.
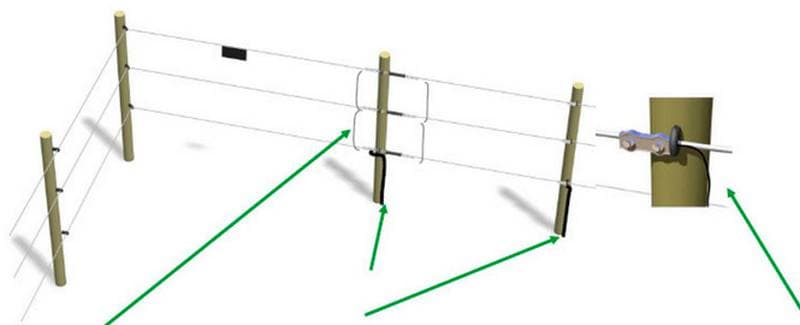
Right edge of the gate. Continue the same wire without breaking it! The wire connector will prevent the wire from jumping out when the gate is opened. You can also connect the wire for conducting electricity under the gate to this connector.
INSTALLING CONNECTORS
Use special connectors to connect the conductors to ensure good contact. Poor quality connectors are subject to corrosion and impair the operation of the electric fence.
Installation procedure:
1. Insert the conductor into the connector
2. Tighten the connector to ensure contact
INSTALLING THE ELECTRIC FENCE (GENERATOR)
1. Install the generator, securing it with the fasteners included in the delivery set.
2. Install the ground pole next to the generator. The ground pole must be buried at least 80 cm into the ground. For dry and loose soil (sand), use several ground poles.
Installation procedure:
Install the generator
Drive the ground pole 80 cm into the ground.
Install the power source.

ORGANIZE HIGH-QUALITY GROUNDING!
The grounding of the electric fence should not be connected to the grounding of buildings, the general grounding of the network or the water supply. For safety reasons, the grounding of the electric fence must be installed at a safe distance (at least 10 m) from the grounding of buildings (or water pipes).
For this reason, it is recommended to use a special high-voltage cable to organize the grounding. This is especially important in cases where the electric fence is located indoors and the grounding cable needs to be taken out of the building.
When connecting the grounding to the water pipe, the consequence may be the sensation of electric shocks, for example, in the shower. Connecting the grounding of the shepherd to the general grounding system of the electrical network can cause interference in the operation of electrical and radio devices, for example, in a telephone.
Install the grounding pole on the bank of a river, lake or on the edge of a ditch (a damp place is required). Never install the grounding pole under the roof, since dry soil (sand) conducts electricity poorly!
CONNECTING THE GENERATOR
1. Install a lightning rod. Lightning rod is necessary to prevent the generator from failing when lightning strikes the electric fence. Connect the lightning rod to the electric fence.
2. Connect the electric fence to the ground and lightning rod.
3. Connect the electric fence to the power source, observing the polarity.

Installation procedure:
1. Install the lightning rod
2. Connect the lightning rod to the electric fence.
3. Connect the generator to the ground and to the lightning rod
4. Connect the generator to the power source
SECOND OPTION FOR INSTALLING A LIGHTNING ROD
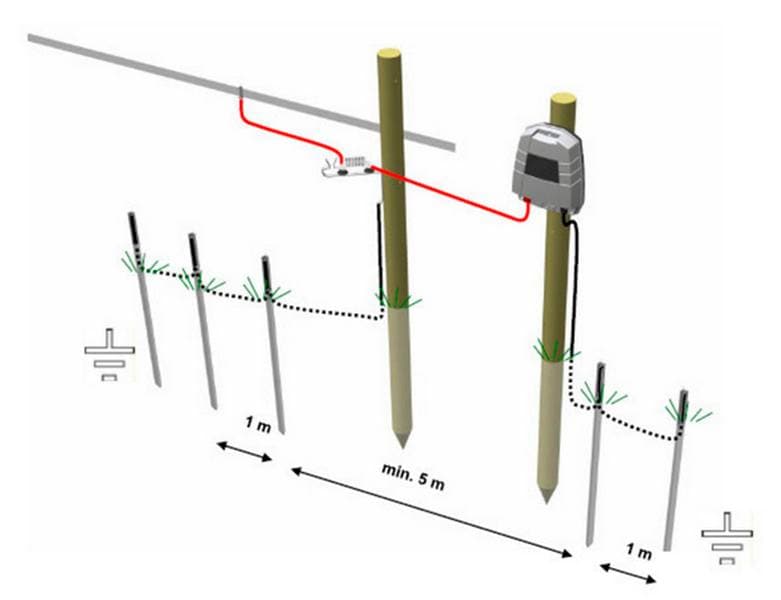
For detailed advice, please call.
0 reviews / Write a review
Related Products
Electric shepherd COWBOY 4200 ECO MAX for cows
Country of origin: Hungary
Manufacturer: Cowboy
Impact force, J: 4.2
Voltage, V: 220/12
Not available
2 600 грн.
Electric Fence EPU-1 (Poland)
Country of origin: Poland
Manufacturer: EPU
Impact force, J: 0.7
Voltage, V: 220/12
Not available
2 100 грн.
Galvanized wire for electric shepherd 1000 m, 1.25 mm GOST
Manufacturer: Unknown
Not available
900 грн.
Cord (string) TRAPPER for electric fence 3 cores, 500 m
Country of origin: Poland
Manufacturer: Horizon
Not available
600 грн.
Electric fence shepherd EPU-3
Country of origin: Poland
Manufacturer: EPU
Impact force, J: 3
Voltage, V: 220/12
Not available
2 500 грн.

